Save Attachments is the main EZDetach window. This is what you use for most of your interactions with the application.
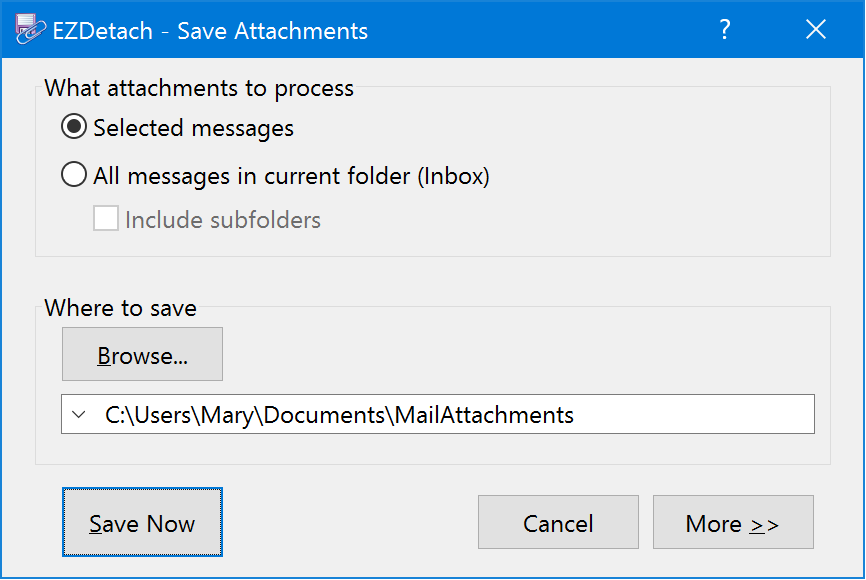
The first time you run EZDetach, you will see the streamlined version of the main window:
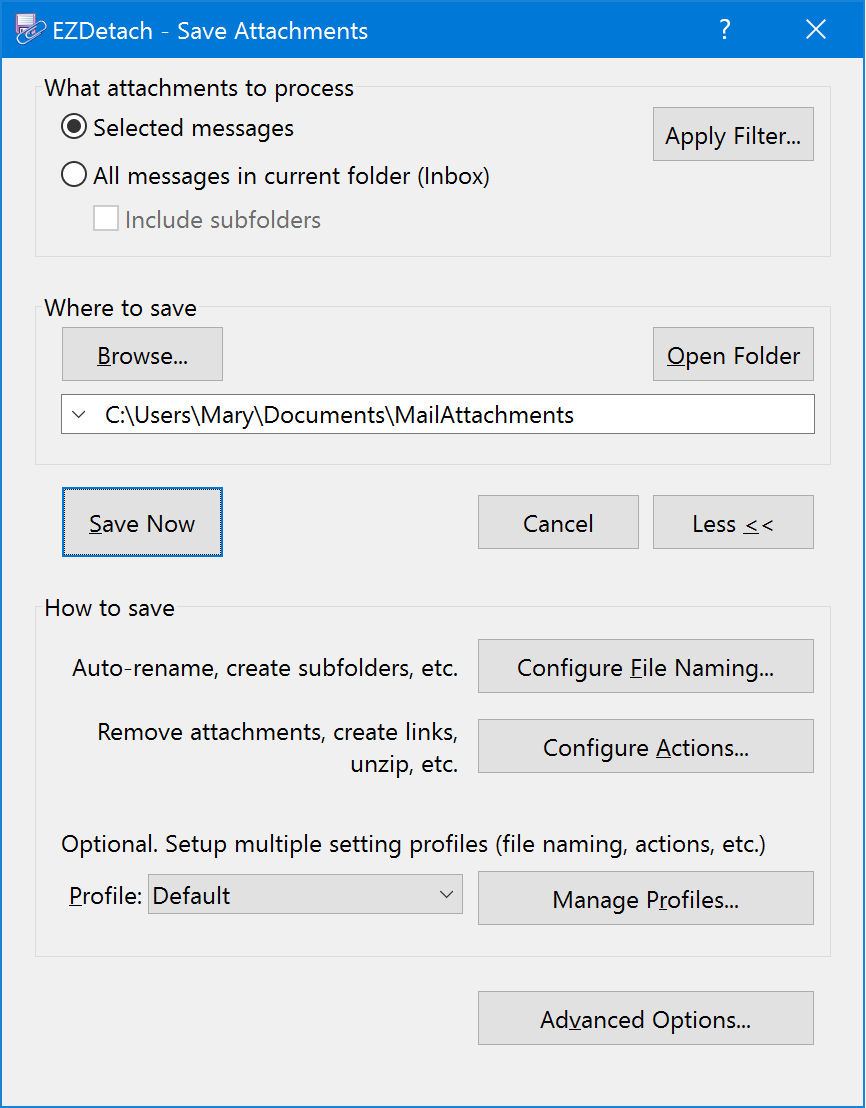
If you click More >> in the lower-right corner, you will see the expanded version with additional options:
Specify from what messages you would like EZDetach to save attachments.
Save attachments from messages which you have highlighted in the Outlook message list before clicking on EZDetach.
Opens the Filter Window, which can be used to specify filter criteria for attachments to be saved.
Specify location for saving attachments. This field has a drop-down which stores recently used folders for quick access.
Open a Browse for Folder window to specify destination folder.
Open the Destination Folder in Windows File Explorer.
Save Attachments
Display the About EZDetach window which has information about the version of EZDetach you are using. If you are a licensed user, this is also where you can find your license key.
Close this window.
Show the smaller, more streamlined version of the window.
Show the expanded version of the window with additional options.
Options that affect how EZDetach generates file names for saved attachments. You can enable multiple checkboxes to append several fields to the file name.
Tip
If you would like more flexibility in naming the files, including an ability to change field order, see Advanced Naming Options Window.
Note
EZDetach always sets the “Date Modified” field on saved files to the time when the corresponding message was received. You can click on the “Date Modified” header in File Explorer to sort saved attachments in chronological order.
Enable this option to include the name of the person who sent the message in the name of the file. For example, if the sender name is John Smith and the attachment name is resume.doc the generated file name would be John Smith - resume.doc.
Enable this option to include the email address of the person who sent the message in the name of the file.
Enable this option to include the “message received” date in the name of the file. Date is formatted as YYYY-MM-DD. If you would like to use a different format, you can configure it using the Advanced Naming Options Window.
Enable this option to include the “message received” time in the name of the file. Time is formatted as hh-mm-ss. If you would like to use a different format, you can configure it using the Advanced Naming Options Window.
Enable this option to include the message subject in the name of the file.
Enable this option to include names of message recipients in the name of the file. If you would like to control how recipients are formatted (Names vs Emails, All vs “To” only), you can do so using the Advanced Naming Options Window.
If this option is OFF, EZDetach will generate unique file name whenever you try to save an attachment and a file with the same name already exists. For example, the first time you try to save an attachment which maps to John Smith - resume.doc, that is the name that is used. The second time, the file will be named John Smith - resume - 1.doc. After that, John Smith - resume - 2.doc, and so on.
If you enable this option, EZDetach will not generate a unique name by appending a counter. In the example above, if a file with the name John Smith - resume.doc already existed in the destination folder, EZDetach would overwrite it with the new attachment.
Warning
Please be sure you understand this option before enabling it!
Subfolder naming controls how EZDetach generates folder names for the saved files. Here you can check only one option. If you would like more flexibility in subfolder naming, please use the Advanced Naming Options Window.
Create subfolders using the name of the message sender. For example, if you receive an attachments from John Smith named resume.doc, with this option ON, it would be saved in the John Smith subfolder of the Destination Folder - John Smith\resume.doc
Use message recipient names as a subfolder name.
Use sender domain name as the subfolder name. For example, techhit.com\resume.doc.
Use Message Date as the subfolder name. Date format is YYYY-MM-DD. Use the Advanced Naming Options Window to configure a different format.
Duplicate Outlook folder hierarchy in the file system. EZDetach will create the same folder tree as what you have in Outlook.
Use message subject as the subfolder name.
Do not create subfolders. Save attachments directly in the Destination Folder.
Opens the Advanced Naming Options Window.
Here you can specify actions to be performed on the attachments after they are saved.
Remove attachments after saving them as files.
Replace the original attachments with attachment links. Attachment links behave very much like the original attachments. They preserve the attachment indicator (paperclip); you can double-click on a link to open the original file. The major benefit of attachment links is that they are much smaller than the original attachments. Instead of many kilobytes (or sometimes even megabytes), the links only take several hundred bytes each. See Attachment Links for details.
Execute a custom script, provided by you, on the saved files. This is a very flexible option which allows you to automate email attachment processing without having to interface with Outlook directly.
For example, you can use it for things like:
See EZDetach API reference for details.
Print attachments to the default printer.
Note
In order for EZDetach to be able to print a particular file type, your system has to be configured for it. If you are able to right-click on a file in Windows File Explorer, click “Print” and print it successfully, EZDetach should be able to print it as well.
Zip files after saving them.
Unzip files after saving them. This option only supports .zip files. Other compressed formats, such as .rar, .7z, etc. are not supported.