Saving Outlook Attachments
Why Use EZDetach
EZDetach is an easy-to-use, flexible and powerful attachment management add-in for Microsoft Outlook. The primary reasons why you might want to use EZDetach are:
- Save attachments in bulk.
- Save / Process attachments automatically.
- Reduce mailbox size.
Save Outlook attachments in bulk
With EZDetach, you can easily save many attachments from multiple messages in one fell swoop. That is so much faster and easier than opening every message and using “Save As” on each attachment.
For example, imagine a recruiter who receives many attachments every day (most of them very descriptively named “resume.doc”). EZDetach can save them all in one fell swoop and even automatically rename them to include sender name in the file name, for example, “John Smith - resume.doc”.
Save and process attachments automatically
There are many situations that require automatically processing incoming email attachments. For example, you might receive orders or feeds from vendors or job notifications or faxes that need to be processed or imported into a document management or a workflow system. You can use EZDetach Scheduler to automatically handle attachments without having to write any Outlook specific code. See automatically saving Outlook attachments below for details.
Reduce mailbox size
Attachments are usually the biggest reason for mailbox size growing too quickly. A huge mailbox can result in several issues:
- Running into mailbox size limits set by system administrators.
- Having Outlook run slower and be less stable.
- Risking corrupting your mail file (PST or OST).
- Make your Public Folders huge and slow.
EZDetach has an option to remove attachments from your mailbox while maintaining links between messages and attachments, so you can still open attachments from inside the messages.
How to run EZDetach
There are several ways to use EZDetach to save Outlook email attachments as individual files outside of Outlook. You can run it manually, or you can configure EZDetach to save attachments automatically, without requiring any action on your part.
- To save attachments manually, invoke EZDetach by clicking the Save Attachments button on the Outlook toolbar, ribbon or right-click menu.
- To save attachments automatically, configure Mapped Folders and Scheduler on the AutoSave tab of the Advanced Options window.
Running EZDetach manually
To open EZDetach, click on the EZDetach button, which is located on the Home tab of the Ribbon in Outlook 2010 or on the main Outlook toolbar in older versions of Outlook.
Tip
EZDetach is also available in the right-click menu in the main Outlook window.
You will see the Save Attachments window:
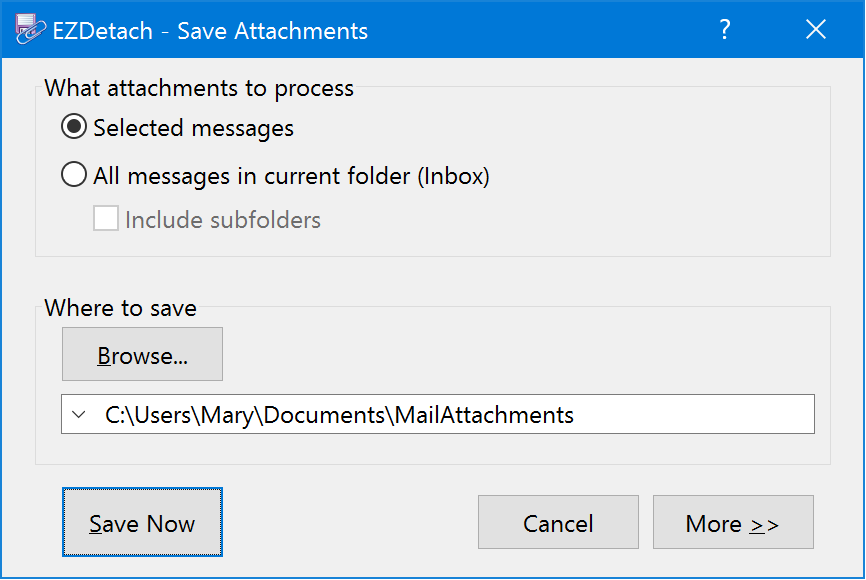
- Specify whether you would like to save attachments from the selected messages, or from all messages in the current folder in the What attachments to process area. To save attachments from multiple messages, highlight them before clicking on EZDetach.
- Click Browse to specify the destination folder.
- (Optionally) Click More >> to specify additional options.
- Click Save Now.
Next time you invoke EZDetach, it remembers the options you used previously. So if you are saving with the same settings, you can simply click Save Now.
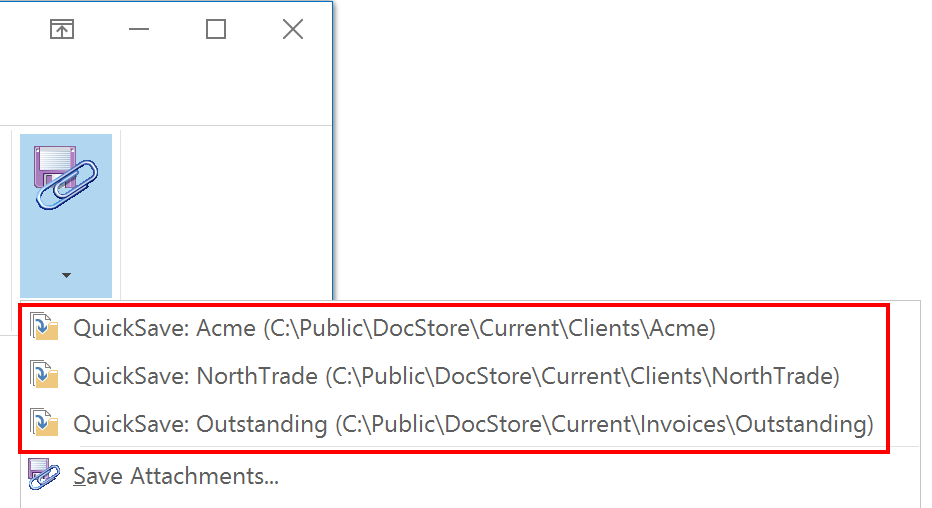
QuickSave
EZDetach QuickSave feature allows you to save attachments without opening the Save Attachments window. The most appropriate folders for the currently selected message are shown as QuickSave menu items on the EZDetach drop-down. Click on one of those folders to save attachments from the selected message into it.
You can control how QuickSave folders are selected (folder suggestions vs. most recent) in the Destination Preferences Window.
Automatically saving Outlook attachments
EZDetach allows you to map Outlook folders to file system folders, such that whenever a message is moved or copied to a particular Outlook folder, its attachments are automatically saved to the corresponding file system folder.
If you have folders for your projects or clients in both Outlook and file system (local hard drive or a shared drive on a file server), you can easily keep their attachments in sync.
To configure:
Open the AutoSave tab of the Advanced Options window. ().

Click Configure Folders to open the Mapped Folders window.
Click Add. You will see the Folder Mapping window.
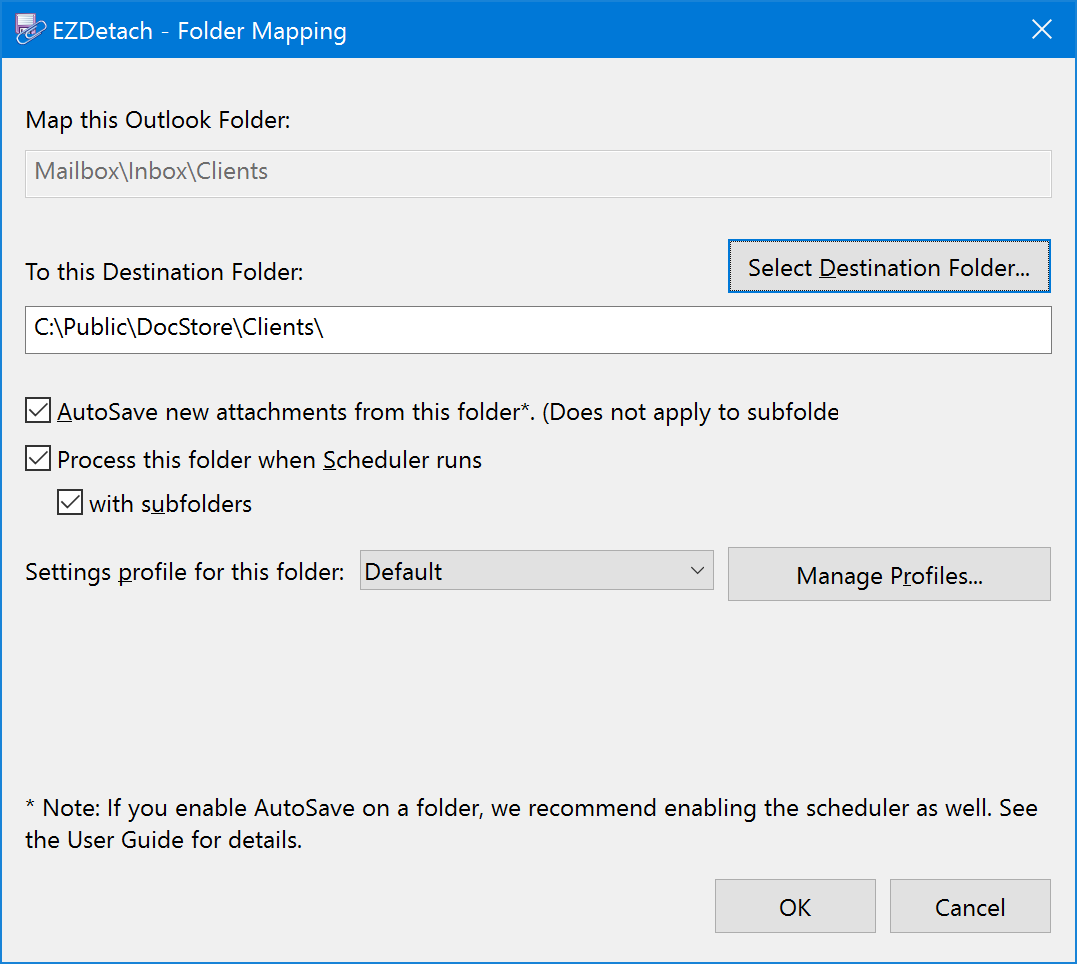
Select the Outlook folder you would like to map.
Specify the corresponding destination folder.
Check Process this folder when Scheduler runs.
Optionally check AutoSave new messages from this folder if you would like messages saved as soon as they appear in the folder.
Click OK to close the Folder Mapping and Mapped Folders windows.
Back on the AutoSave tab, click Configure Schedule to set Scheduler interval.
Now whenever a new message lands in that folder, its attachments will be saved in the folder you specified.
Warning
In most cases when using the scheduler, you want to either remove attachments and replace them with links or enable “Do not process messages which have been processed before”, located on the History Tab of the Advanced Options window. Otherwise, a new copy of every attachment will be saved every time the scheduler runs.
Note
AutoSave only works when Outlook is running. If a new message arrives directly into that folder when Outlook is closed, AutoSave will not pick it up. To deal with cases like that, also configure a scheduler for the same folder whenever you use AutoSave.
Tip
AutoSave is a perfect feature to use in combination with our SimplyFile product. SimplyFile is a much more efficient alternative to filing email messages into Outlook folder using drag and drop.
Automatically saving new attachments using Outlook rules
You can use Scheduler in combination with Outlook rules to automatically process new messages which match a set of criteria you specify. This works on both received and sent messages.
- Create an Outlook rule that matches the messages which you would like to process. See the Microsoft website for instructions on creating rules.
- In the “What do you want to do with the message?” step select “move a copy to the specified folder”.
- Click on the “specified” hyper link in the lower pane to select a folder.
- Finish creating the rule as usual.
- Configure EZDetach Scheduler to run on the folder you specified above.
Please refer to Outlook documentation for details on creating and working with rules.
Tip
You can configure multiple rules and mapped folders for different types of messages.
Attachment Links
Replacing attachments with links
EZDetach has an option to replace attachments with Attachment Links. Attachment links behave very much like normal attachments. Messages retain an attachment indicator (paperclip); you can double-click on a link to open the original file.
The big benefit of attachment links is that they take up significantly less space than the original attachment. Replacing attachments with link can result in a significant reduction in your mailbox size.
For example, here is an attachment in Outlook (Report.docx). It’s size is 2 megabyte.

Here is an attachment link, which replaced the original attachment. Its size is only 257 bytes.

Reattaching links
If you decide that you would like to put attachment back into messages, you can use the Reattach Links command in the Link Maintenance Window.
Forwarding attachments with links
If you need to forward a message with attachment links to somebody else, EZDetach can prompt you to reattach files when you send the message (after clicking “Send”). Only the forwarded message will have files re-attached, the original email will retain links. This option is used to enable the reattach prompt.